

Adobe XD Plugin
Mit dem Crowdin for Adobe XD Plugin kannst du Texte aus Crowdin in deinen Designs verwenden und so Zeit für Designer und Entwickler sparen. These could include original or translated texts. Bei Bedarf kannst du neue Texte hinzufügen (z. B. Dialogtitel oder Schaltflächenbeschriftungen) und sie an Übersetzer in Crowdin senden.
- Quickly generate multilingual creative assets.
- Translate mockups and test them in different languages before the programming starts.
- Verwende nicht mehr „Lorem Ipsum“, sondern füge stattdessen echte Texte aus Crowdin zu deinen Prototypen hinzu.
- Erstelle Quellstrings in deinen Designs und lade sie in dein Crowdin-Projekt hoch. This way, uploaded strings could be used by developers, which reduces time spent on development.
- Lade Screenshots mit Tags in dein Crowdin-Projekt hoch.
- Sign in to Adobe XD.
- Navigate to Plugins > Browse plugins….
- Click Browse.
- Use the Search all plugins field to find Crowdin for Adobe XD plugin.
- Click Install.
Führe die folgenden Schritte aus, um deine Crowdin-Zugangsdaten in Adobe XD anzugeben:
- On the left panel, click Plugins > Crowdin for Adobe XD.
- Click .
- Provide your Personal Access Token.
- Click Save.
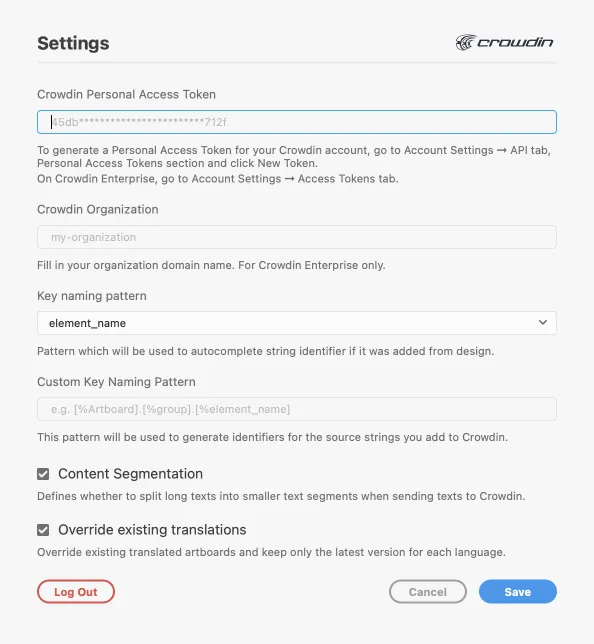
Gehe folgendermaßen vor, um ein neues Token in Crowdin zu generieren:
- Gehe zu Kontoeinstellungen > API, zum Abschnitt Persönliche Zugriffstoken, und klicke auf Neues Token.
- Gib einen Tokennamen an und klicke auf Erstellen.
Um das Crowdin-Projekt auszuwählen, mit dem du arbeiten möchtest, klicke auf das Dropdown-Menü und wähle ein Projekt aus der Liste aus. Later, you can use the same drop-down menu to switch to another project if needed.
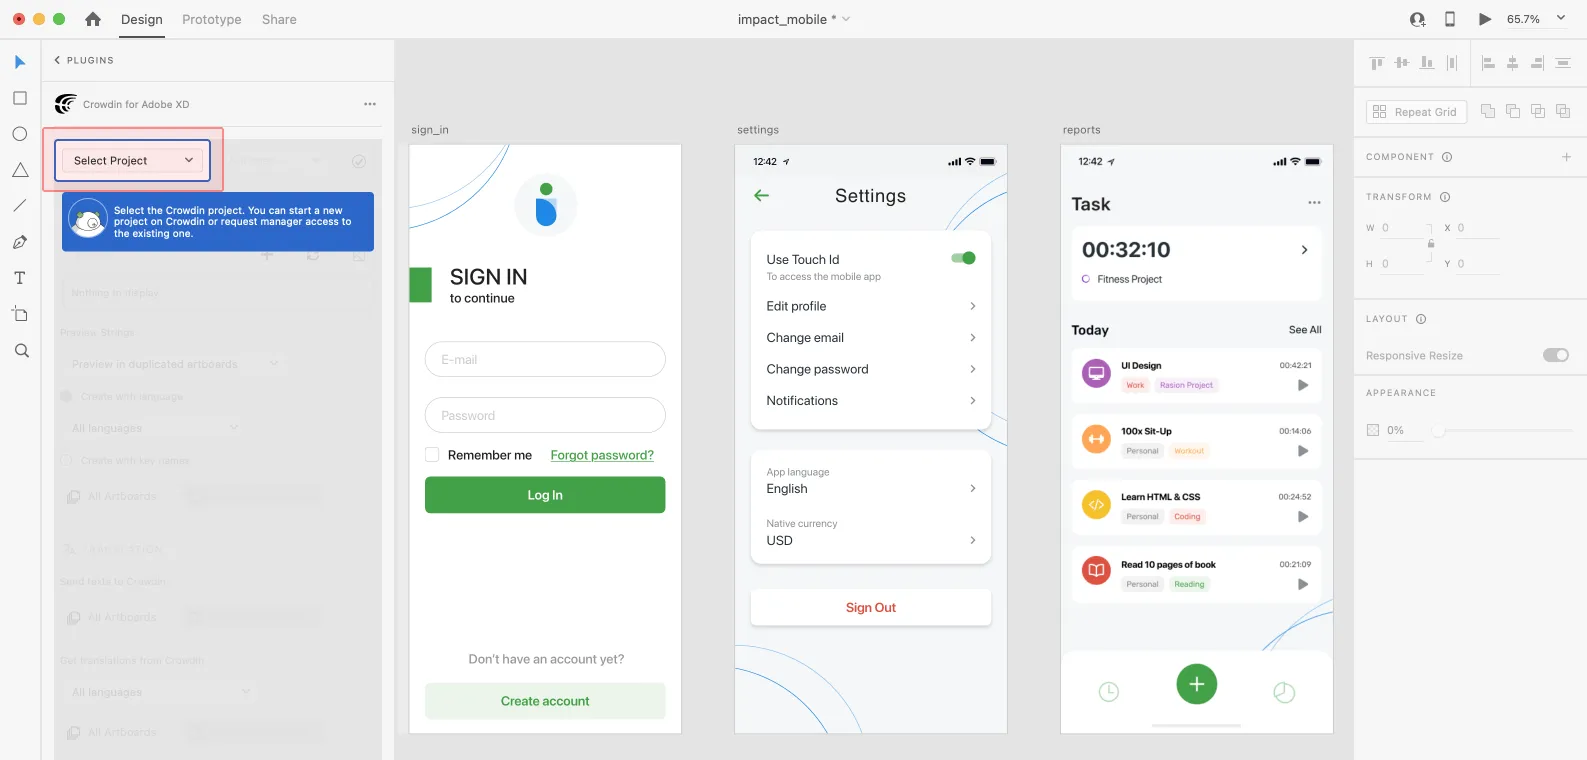
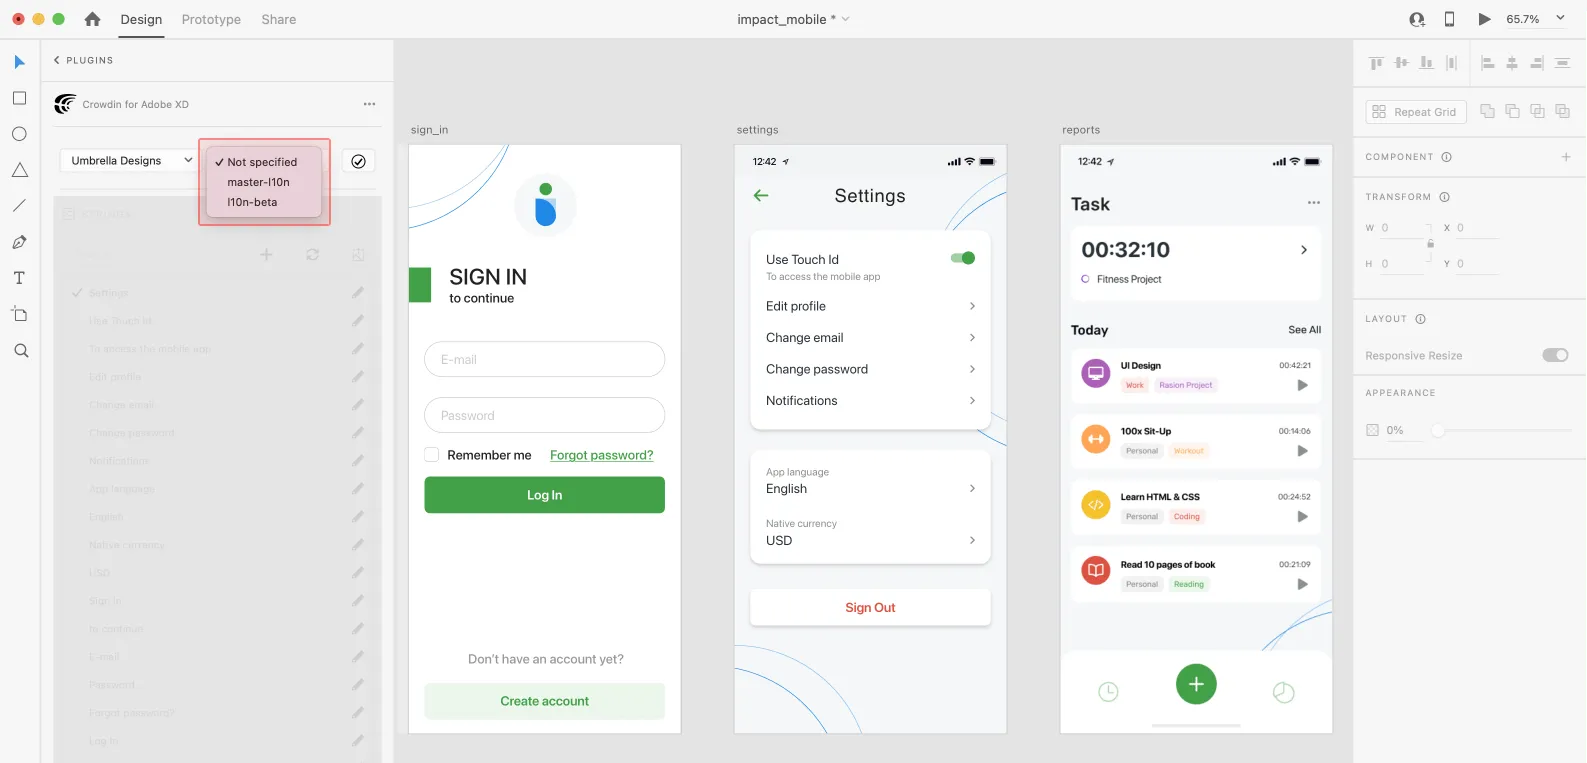
Select the specific branch your content will be uploaded to. Wenn dein Crowdin-Projekt keine Branches hat, lasse dieses Feld leer.
Use the Strings section when localizing UI and working on dynamic pages with your development and marketing teams. In diesem Abschnitt kannst du Quelltexte aus Crowdin mit einem Klick zu deinen Designs in Adobe XD hinzufügen. Nachdem die Texte in den Designs verwendet wurden, kannst du getaggte Screenshots für die Referenz der Übersetzer automatisch wieder in Crowdin hochladen.
Using Source Strings from Crowdin in Adobe XD
Abschnitt betitelt „Using Source Strings from Crowdin in Adobe XD“- Open the Crowdin plugin for Adobe XD.
- In the Strings section, use the Search field to find the specific copy. You can search strings by source text, string identifier, or context.
- Select the text layer to which you want to add text and click on the needed string.
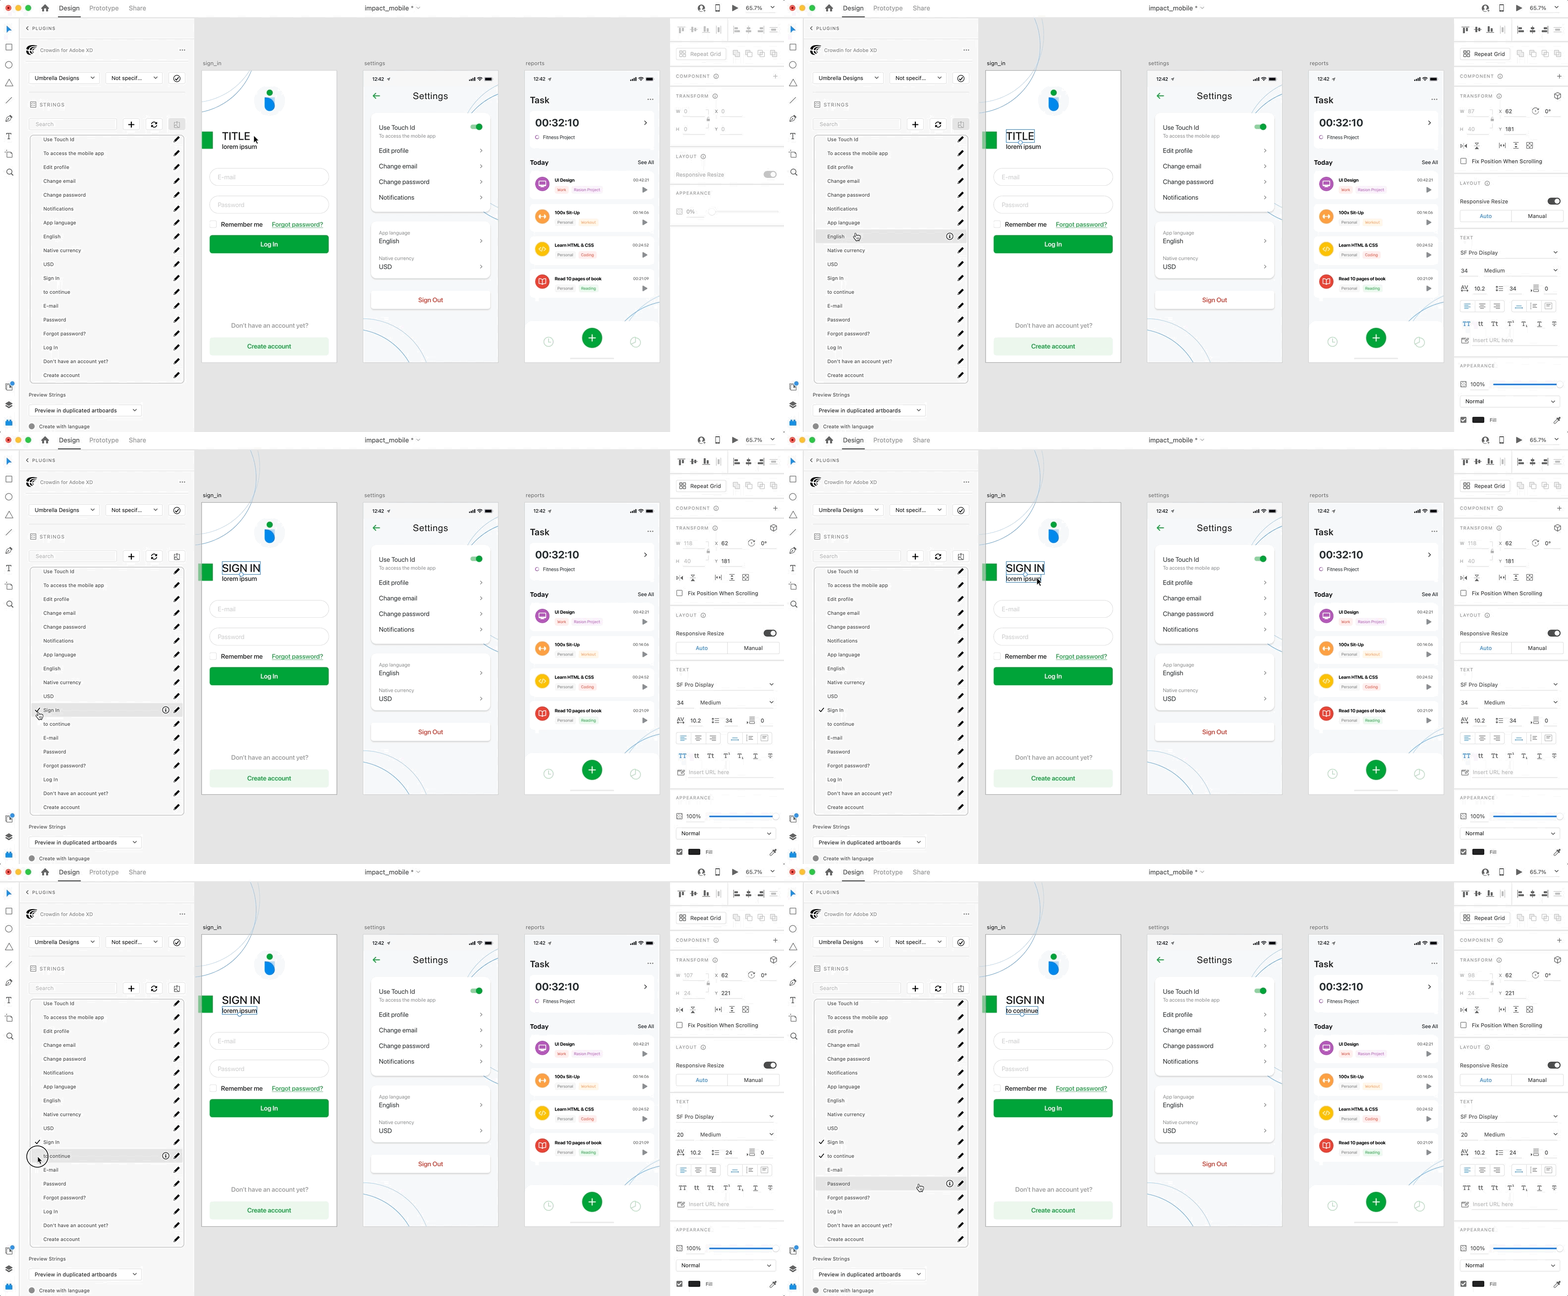
Nachdem du die Quelltexte aus Crowdin in deinen Designs verwendet hast, werden sie mit den Textfeldern verknüpft. Du kannst dann Übersetzungen in der Vorschau anzeigen für diese Texte in Adobe XD und Screenshots hochladen für sie in dein Crowdin-Projekt.
Du kannst einen einzelnen Crowdin-String mit einem oder mehreren Textfeldern in Adobe XD verknüpfen. Ein Textfeld kann jedoch nur mit einem einzigen Crowdin-String verknüpft werden. If you link a text field with an existing connection to a new Crowdin string, the previous connection will be terminated, and a new connection will be established. Wenn du die Verknüpfung eines Crowdin-Strings mit allen Textfeldern aufheben möchtest, mit denen er zuvor verknüpft war, klicke mit der rechten Maustaste auf das Verknüpfungssymbol neben dem gewünschten String.
Adding Source Strings from Adobe XD to Crowdin
Abschnitt betitelt „Adding Source Strings from Adobe XD to Crowdin“You can add strings already used in the designs or create and add completely new strings.
- Open the Crowdin plugin for Adobe XD.
- To add the strings used in the designs, select the whole artboard, multiple artboards, or the needed strings on the artboards. Alternatively, skip this step if you want to add a new string.
- In the Strings section, click .
- In the appeared dialog, fill in the required fields.
- (Optional) To add labels to the strings, alternately select them from the Label drop-down menu and click Save.
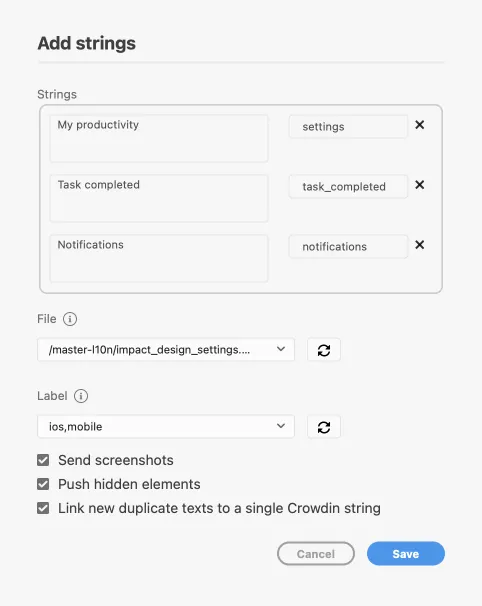
Um dieselben Strings in mehrere Dateien in Crowdin einzufügen, wähle nacheinander die benötigten Dateien aus dem Dropdown-Menü Datei aus.
Deaktiviere die Option Ausgeblendete Elemente übertragen, wenn einige Zeichenflächen ausgeblendete Elemente enthalten, die nicht zu Crowdin hinzugefügt werden sollen.
When adding multiple strings, you may want to select Link new duplicate texts to a single Crowdin string. It’s useful in the following cases:
- Wenn du mehrere Textfelder mit demselben Text hinzufügst, fügt das Plugin deinem Crowdin-Projekt nur einen String hinzu und verknüpft alle doppelten Textfelder damit.
- Wenn dein Crowdin-Projekt bereits einen String mit demselben Text enthält, den du aus den Designs hinzufügst, verknüpft das Plugin die Textfelder nur mit dem vorhandenen String und erstellt keinen neuen.
Hinzugefügte Strings werden in dein Crowdin-Projekt übertragen und außerdem in der Liste im Abschnitt Strings angezeigt. You can edit or delete the strings from the same list anytime. Die entsprechenden Änderungen werden auch auf die Strings in deinem Crowdin-Projekt angewendet.
Configuring ICU Source String Placeholders
Abschnitt betitelt „Configuring ICU Source String Placeholders“When using ICU strings in your design, you can set the placeholders’ values, and after adding such strings to designs, they will be displayed in a formatted view with the preconfigured values.
Sobald du den benötigten ICU-String aus Crowdin in deinem Design verwendest, kannst du die Werte seiner Platzhalter konfigurieren.
- Open the Crowdin plugin for Adobe XD.
- In the Strings tab, use the Search field to find the specific copy. You can search strings by source text, string identifier, or context.
- Click on the needed ICU string.
- Click Set placeholders.
- Type the needed values for ICU string placeholders.
- Click Submit to save the entered placeholders.
- Click Edit String to update the source string text in designs.
When previewing translations for ICU strings in Adobe XD, they will also be displayed in a formatted view if the values were preconfigured beforehand.
Um das Hinzufügen von Strings aus Adobe XD zum Crowdin-Projekt zu vereinfachen, kannst du in den Plugin-Einstellungen das gewünschte Muster für die Benennung der Schlüssel für die Quellstring-IDs festlegen. Das Crowdin-Plugin für Adobe XD schlägt anhand des ausgewählten Musters String-IDs für neue Strings vor. While adding new source strings, you can always edit the suggested identifier to the preferred look.
To select the key naming pattern, follow these steps:
- Open the Crowdin plugin for Adobe XD.
- Open the plugin Settings.
- In the Key naming pattern section, select the preferred option from the drop-down menu.
Besides the existing patterns, you can configure your own pattern. To use a custom pattern, select the Custom key naming pattern option from the drop-down list and specify your pattern in the Custom Key Naming Pattern field.
When adding source strings used in the designs, make sure to keep Send screenshots selected. Das Crowdin-Plugin für Adobe XD lädt daraufhin Screenshots zusammen mit den Quellstrings hoch.
Außerdem kannst du Screenshots über die Option Screenshots aktualisieren aktualisieren, während du einen Crowdin-String bearbeitest, der mit den Textfeldern in den Designs verknüpft ist.
Zusätzlich kannst du Screenshots für mit Textfeldern in Designs verknüpfte Strings gesammelt zu Crowdin hochladen.
- Open the Crowdin plugin for Adobe XD.
- Select one or more artboards with the linked strings.
- In the Strings section, click to upload screenshots for selected artboards.
Read more about Screenshots.
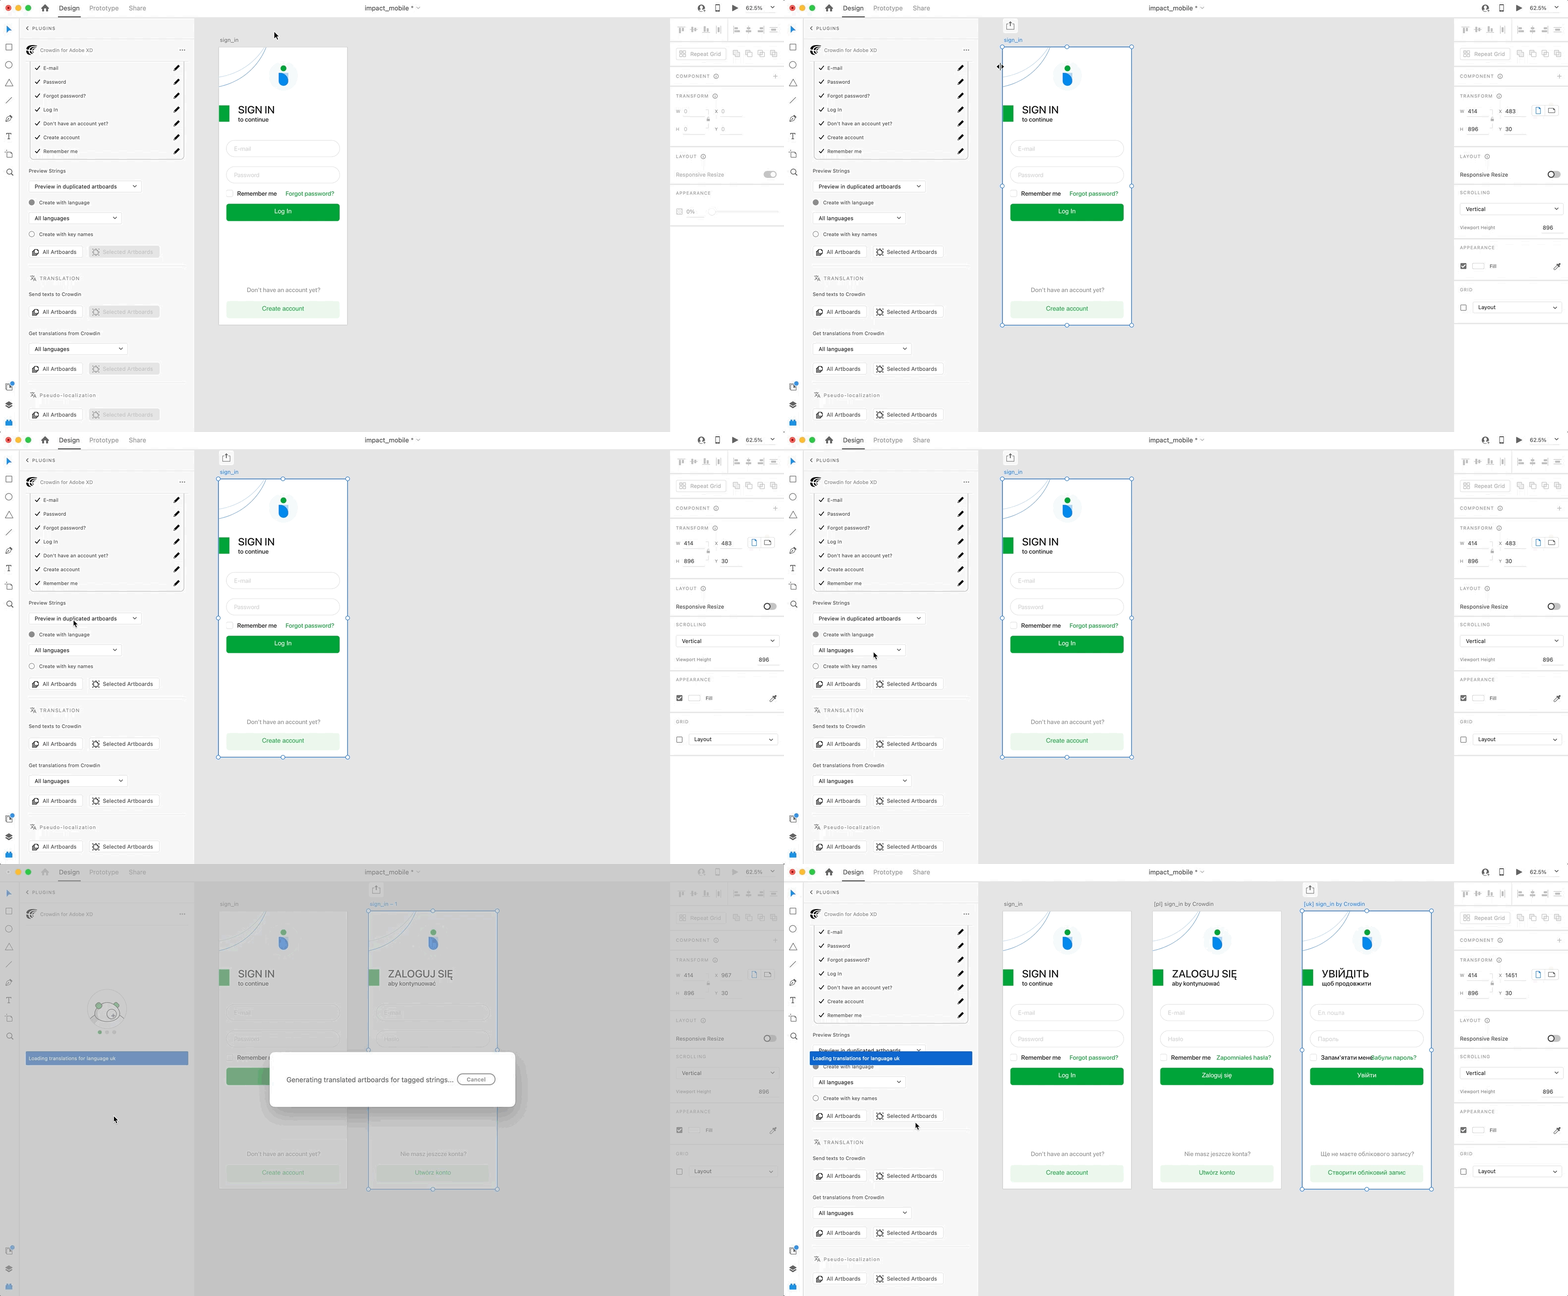
Zeige Übersetzungen aus Crowdin für die in den Designs in Adobe XD verwendeten Strings in der Vorschau an. You can preview translations in the new artboards or the original ones. When previewing translations in the new artboards, you can populate them with the actual translations or with string keys for further use by developers.
To preview strings populated with translations, follow these steps:
- Open the Crowdin plugin for Adobe XD.
- In the Strings > Preview Strings section, select Preview in duplicated artboards or Preview in the current artboards.
- Select Create with language.
- Select the target language you want to preview translations for. You can also choose All languages.
- Choose the content you want to preview in Adobe XD. Select All Artboards or Selected Artboards.
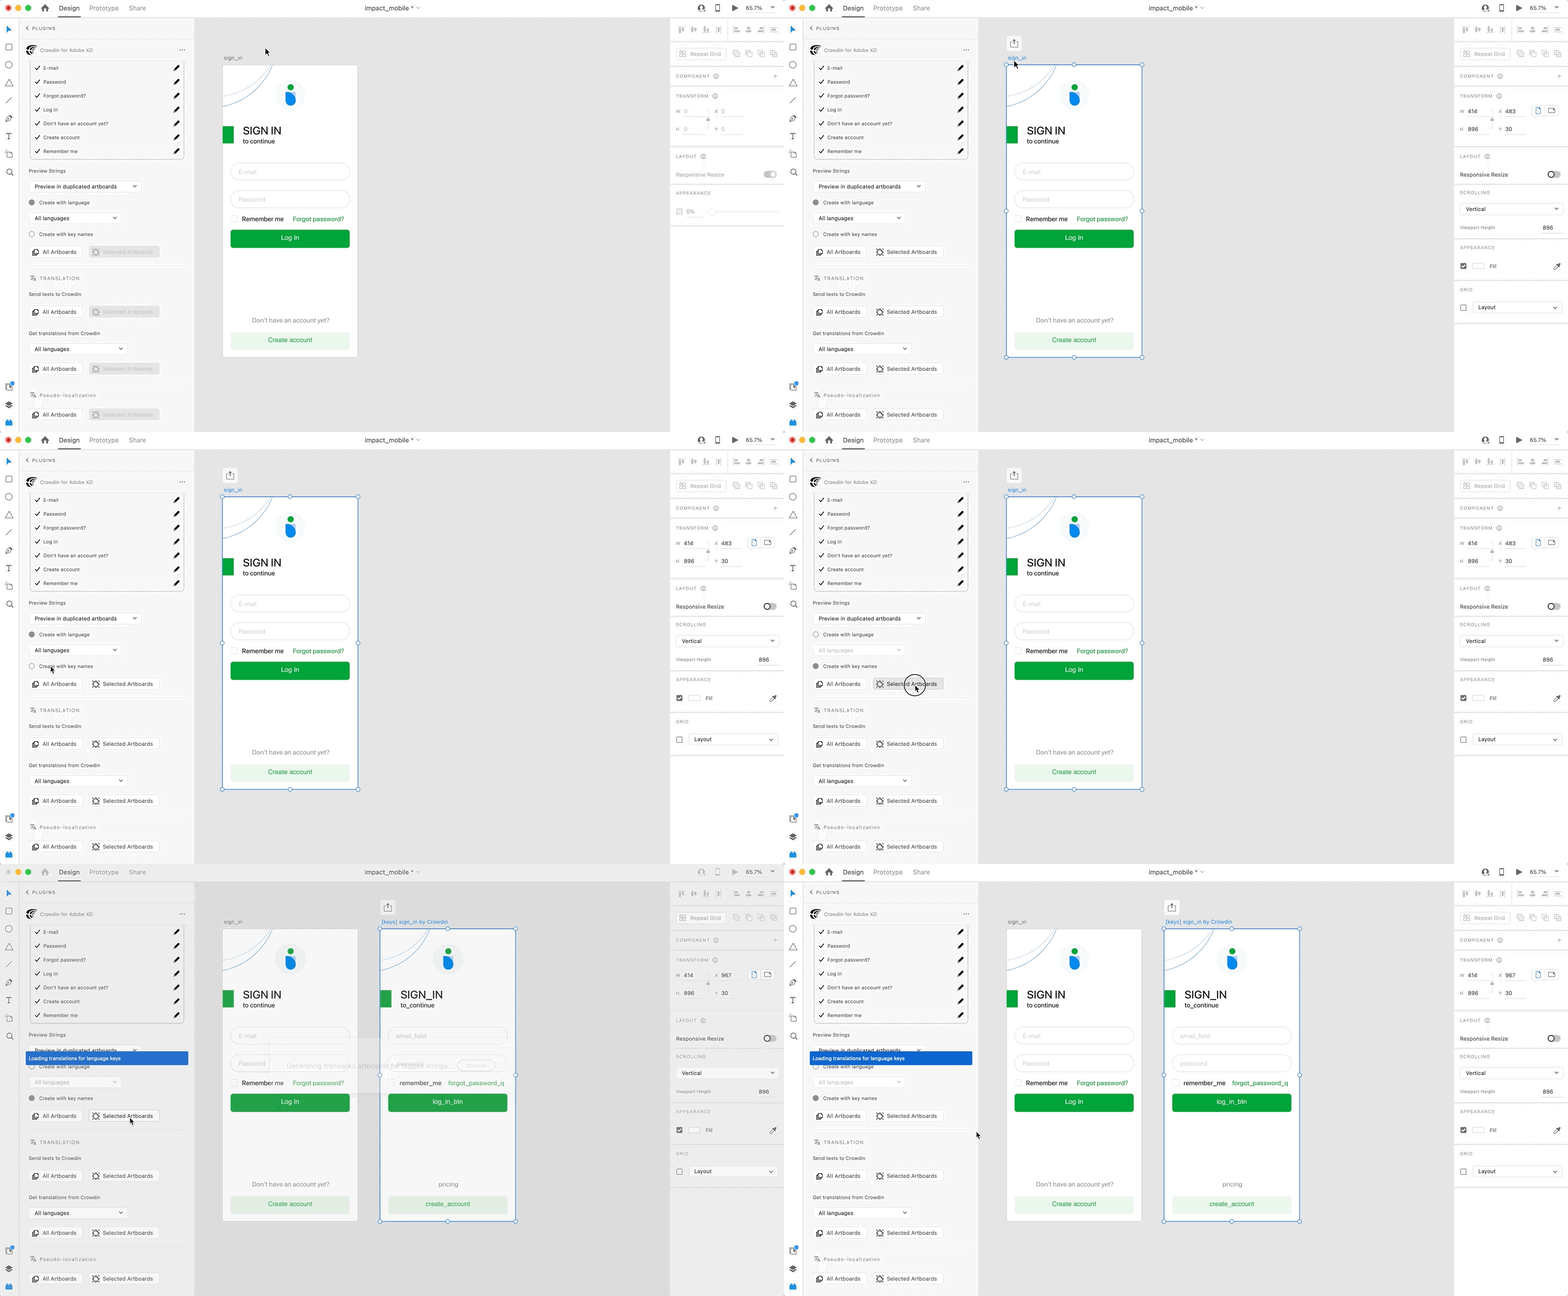
To preview strings populated with key names, follow these steps:
- Open the Crowdin plugin for Adobe XD.
- In the Strings > Preview Strings section, select Preview in duplicated artboards.
- Select Create with key names.
- Choose the content you want to preview in Adobe XD. Select All Artboards or Selected Artboards.
Use the Translation section to localize static pages, like brochures and banners. In diesem Abschnitt kannst du Texte mit Kontext für Übersetzer an Crowdin senden und übersetzte Versionen zurück zu Adobe XD hochladen.
Sending Texts for Translation to Crowdin
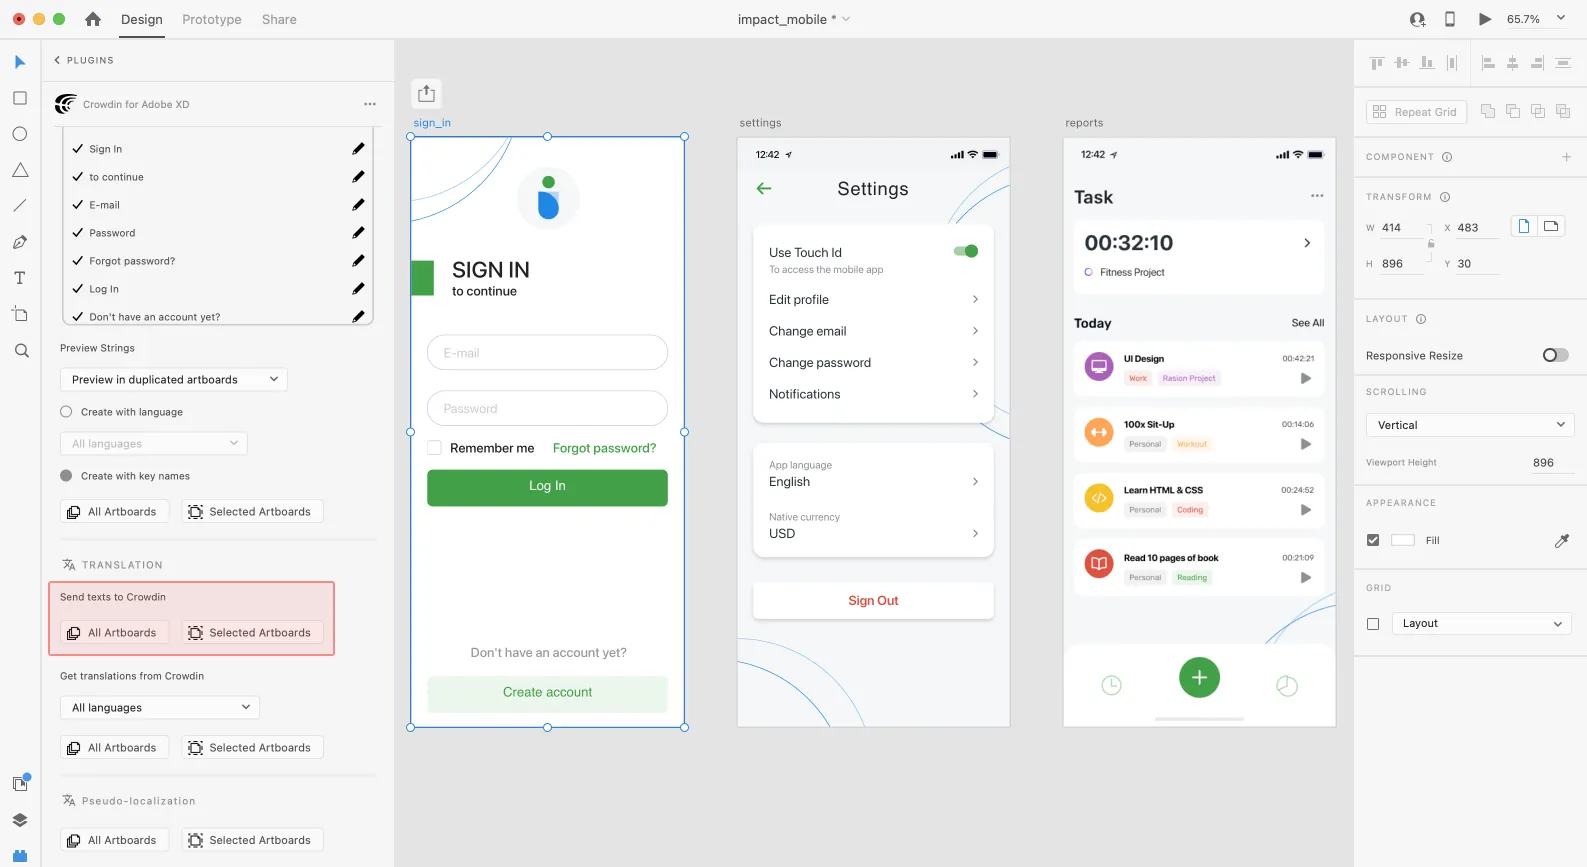
Abschnitt betitelt „Sending Texts for Translation to Crowdin“You can send text for translation either from selected or all artboards from an Adobe XD file. Translators will work with those texts in the list view and use designs as an additional context for even higher translation quality.
In Crowdin wird ein Stammordner Adobe XD plugin erstellt. It will contain a subfolder named after your XD file with HTML files for each artboard inside. This folder can also contain a free-text.html file with texts not included in any of the artboards. If needed, you can disable content segmentation in the plugin Settings so long texts will not be split into sentences.
To send Adobe XD designs for translation, follow these steps:
- Open the necessary Adobe XD file.
- Go to Plugins > Crowdin for Adobe XD.
- In the Translation > Send texts to Crowdin section, select the content you’d like to translate. Select All Artboards or Selected Artboards.
Nachdem die Quelldateien in dein Crowdin-Projekt hochgeladen wurden, kannst du Mitwirkende einladen, sie zu übersetzen und Korrektur zu lesen.
Mehr über Übersetzungsstrategien erfahren.
Uploading Translations from Crowdin to Adobe XD
Abschnitt betitelt „Uploading Translations from Crowdin to Adobe XD“Du kannst Texte zwischen Adobe XD und Crowdin-Projekten jederzeit synchronisieren, um die übersetzte Version in Adobe XD zu testen oder mehrsprachige Assets zu erstellen.
To upload translated copies to Adobe XD, follow these steps:
- Open the necessary Adobe XD file.
- Go to Plugins > Crowdin for Adobe XD.
- In the Translation > Get translations from Crowdin section, select the target language you want to upload translations for. You can also select All languages.
- Select the content you want to preview in Adobe XD. Select All Artboards or Selected Artboards.
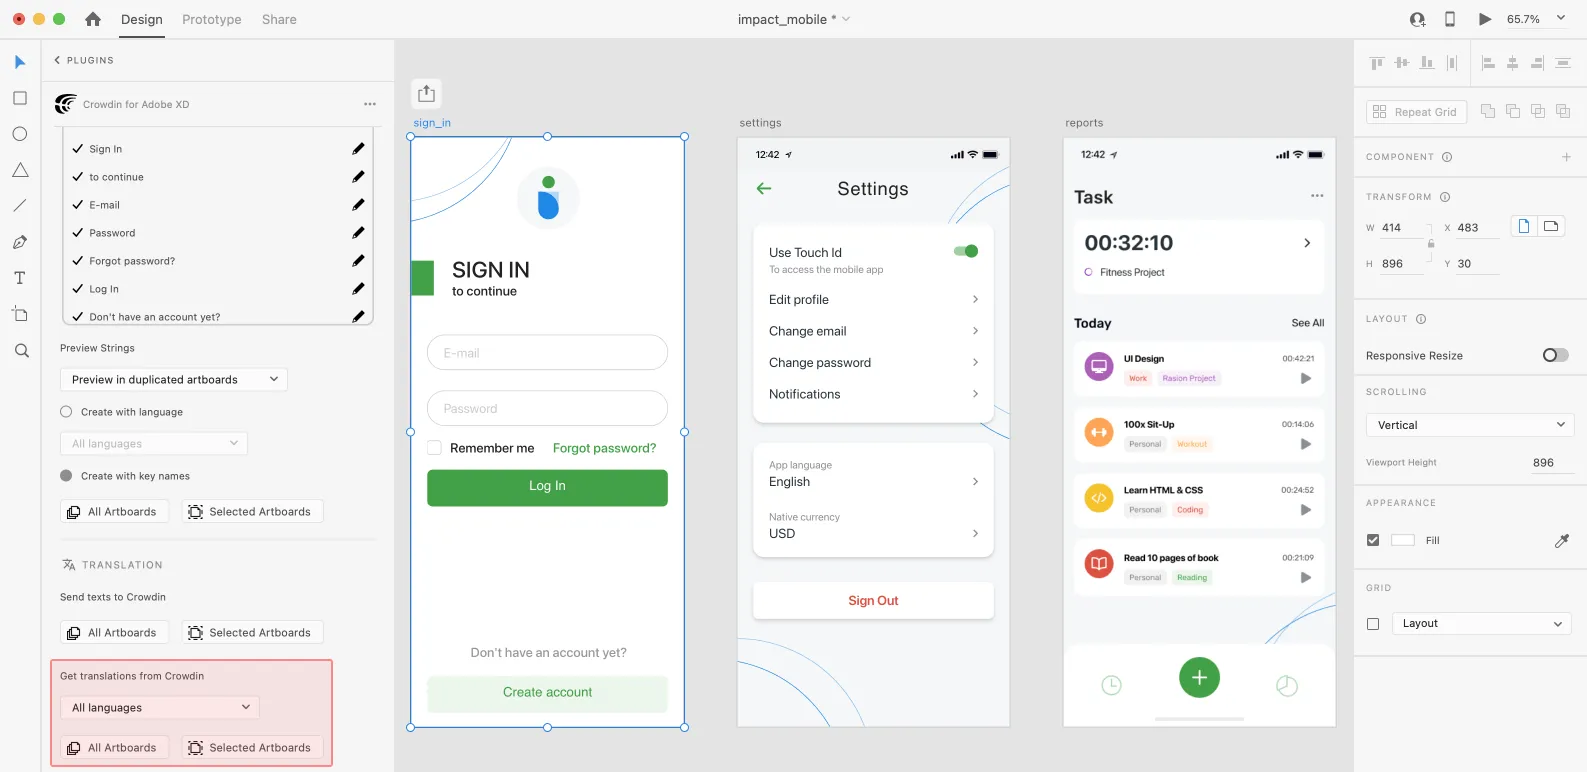
After uploading translations to Adobe XD, the modified file will contain a separate artboard with translations for each target language. The newly uploaded translated versions won’t override the ones you uploaded previously. You can always delete the translated copies you no longer need.
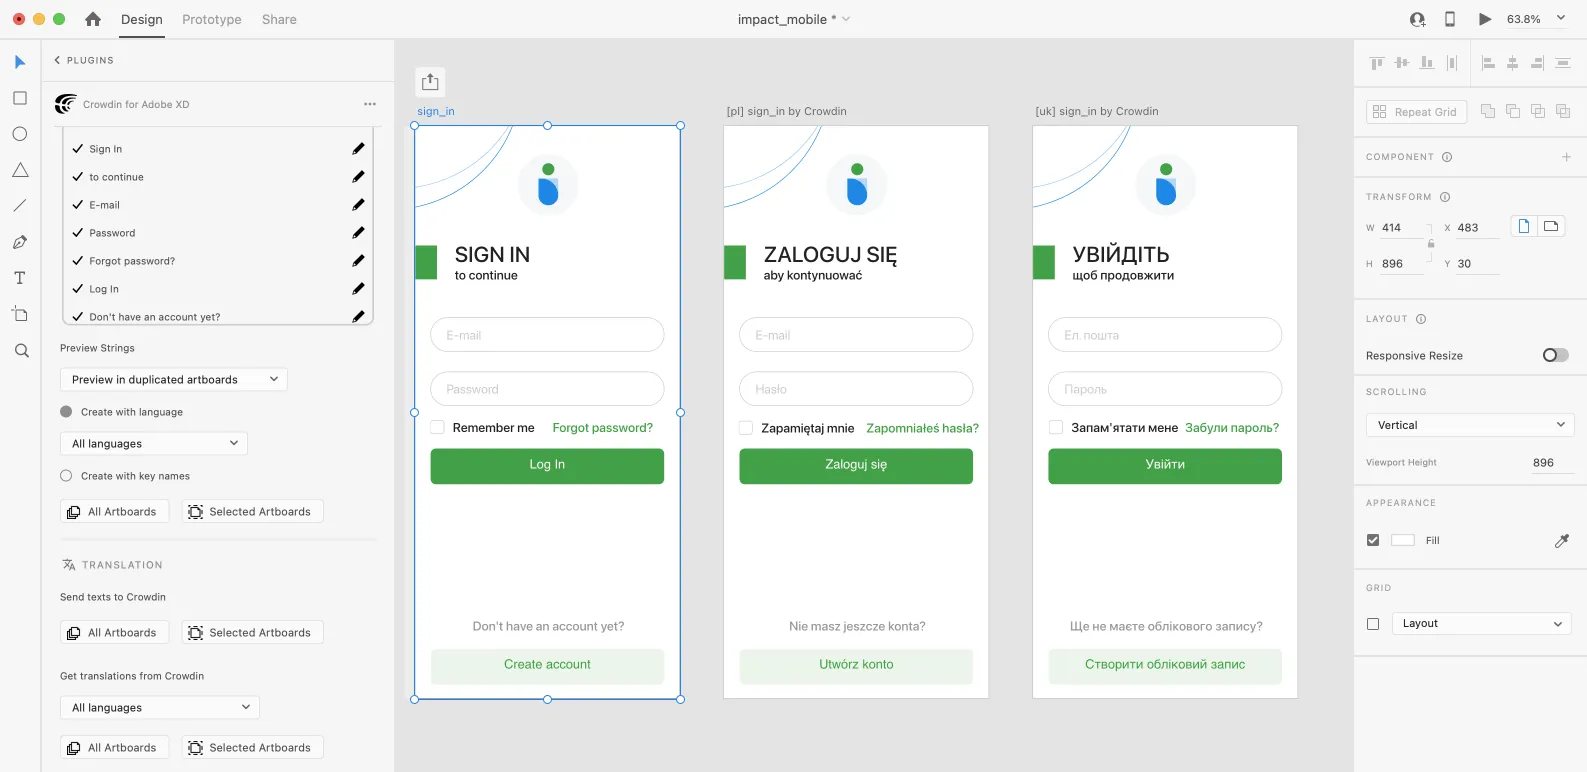
If you’d like the newly uploaded translated versions to override the previously uploaded ones, open the plugin Settings and select Override existing translations.
Even before translations are completed, you can test whether your application is ready to be localized using pseudo-localization. This feature allows you to simulate how the application’s UI will look with different languages to check whether the source strings should be modified before the project localization starts.
Once you send your texts for translation, you can start pseudo-localization.
- Open the necessary Adobe XD file.
- Go to Plugins > Crowdin for Adobe XD.
- In the Pseudo-localization section, select the content you’d like to test with pseudo-localization. Select All Artboards or Selected Artboards.
- In the dialog box that appears, you can choose from predefined presets (French, Cyrillic, Chinese, Arabic) and configure the settings according to your preferences:
- Length Correction – allows you to make strings longer or shorter to see whether your product’s UI properly handles other languages. As translations in some languages can be longer or shorter than the source texts in your project.
- Prefix/Suffix – allows you to add special characters at the beginning and end of each string.
- Character Transformation – replaces English characters with easily identifiable accented versions, random Arabic symbols, or Chinese ideographs to make it obvious if there are some hard-coded strings in your application.
- Click Pseudo-localize.
Read more about Pseudo-localization.